Generated with Monsha
Electrical Rough-In: A Beginner's Guide
Worksheet · Age 15–16 · English (UK)
Electrical Rough-In: A Beginner's Guide
Introduction to Electrical Rough-In
In this worksheet, you will learn about the "rough-in" phase of electrical installation in a new house. This is the stage where wires and boxes are installed before the walls are covered with drywall.
Activity 1: Warm-up Questions
Discuss or write your answers to the following questions:
- Have you ever seen the inside of a house while it was being built? What did you notice about the walls and the wires?
- Why do you think it is important to plan the location of electrical outlets and switches before the walls are finished?
- What are some safety risks involved when working with electricity, even if the power is turned off?
Activity 2: Label the Diagram
Test your knowledge of the common electrical components used during the rough-in phase. Look at the diagram below and match the numbers to the correct terms from the word bank.
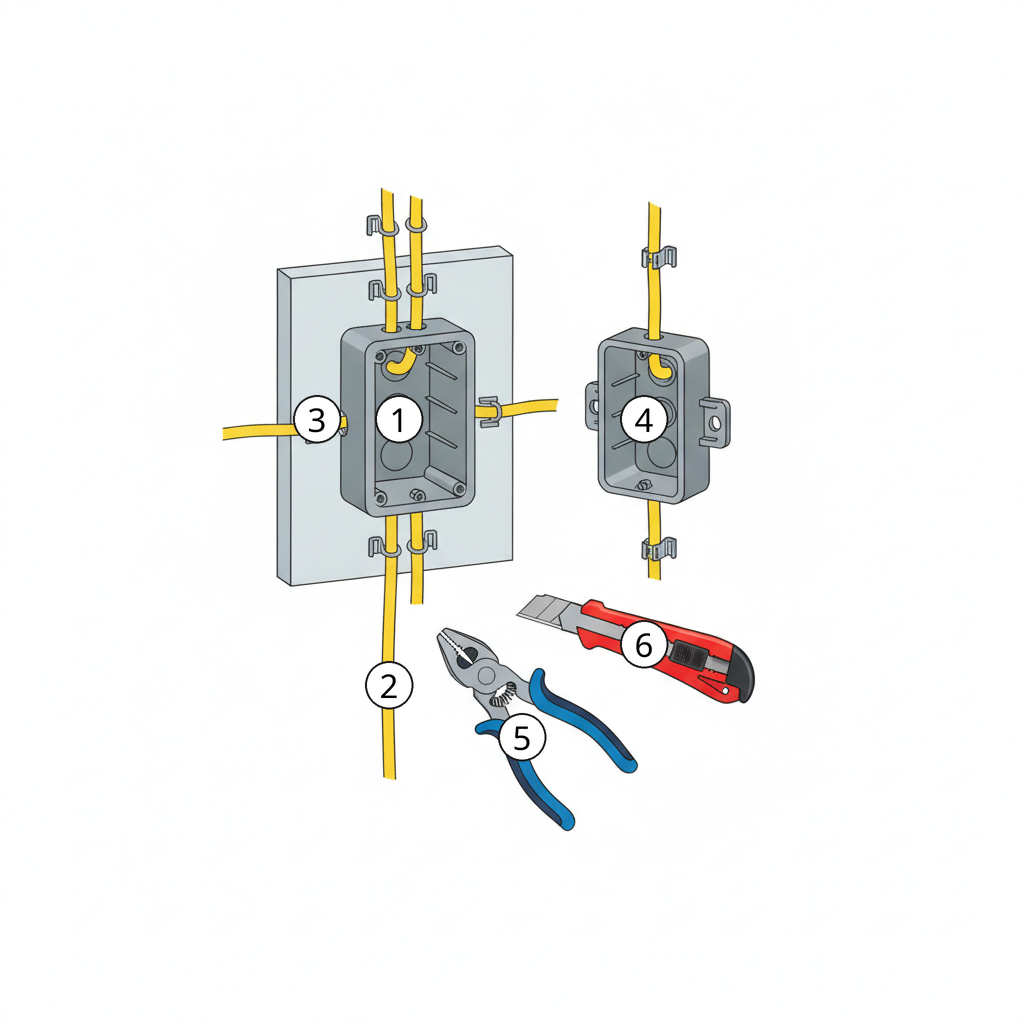
Word Bank
- Utility knife
- Two-gang switch box
- Wire staples
- Romex electrical wire
- Saddle box (for ceiling fan)
- Wire strippers
Write the correct term for each number:
-
-
-
-
-
-
Activity 3: Vocabulary Gap Fill
Complete the sentences below using the words from the Word Bank in Activity 2. One word will be used twice.
- First, you need to mount the ______________________ on the stud, usually about 1.2 metres (4 feet) from the floor for light switches.
- If you are installing a heavy ceiling fan or light fixture, you should use a ______________________ because it is designed to hold more weight.
- You must use a drill to make holes in the wooden studs so the ______________________ can pass through the walls.
- When running ______________________ through the house, make sure it is not twisted as it comes off the spool.
- After running the wire, use ______________________ to secure it to the studs within 15 cm (6 inches) of the electrical box.
- To connect the wires inside the box, use ______________________ to remove the plastic insulation from the copper ends, and a ______________________ to cut the outer jacket.
Activity 4: Comprehension Check (Multiple Choice)
Choose the correct answer based on the video instructions:
- What is the "6/12 rule" for placing outlets? a) Outlets must be 6 inches apart and 12 inches high from the floor. b) Outlets must be within 6 feet of a door and no more than 12 feet apart on a wall. c) There must be exactly 6 outlets for every 12 feet of wall space. d) Outlets must be 12 feet from the floor and 6 feet from the ceiling.
- Where should a switch box be placed relative to a door? a) On the hinge side so it is hidden when the door is open. b) In the exact centre of the wall. c) On the doorknob side so you can reach it easily when entering. d) At least 2 metres away from any door frame.
- Why does Josh use 12/3 wire for the ceiling fan instead of 12/2? a) 12/3 wire is much cheaper for large rooms. b) It allows for separate power controls for both the light and the fan. c) It is a thinner wire that fits better in the saddle box. d) 12/3 wire is only used for ground connections.
- What tool does Josh recommend for drilling in tight spaces, such as near a window? a) A standard hammer drill. b) A manual hand-saw. c) A right-angle drill. d) A long extension bit.
Activity 5: True or False
Read the statements below and circle True (T) or False (F):
- Josh is a licensed professional electrician. (T / F)
- 12/2 wire is a heavier gauge and can handle more load than 14/2 wire. (T / F)
- Wires should be stapled at least 24 inches away from the electrical box. (T / F)
- Labeling the wires with a marker helps you identify them after the drywall is up. (T / F)
- The holes for the wires should be drilled approximately 2 feet (60 cm) from the floor. (T / F)
Activity 6: Sequencing Events
Put the following steps for an electrical rough-in in the correct order (1–5):
- Run the wire from the main panel to the switch box and then to the outlets.
- Mark the studs at the correct height for switches (4 feet) and outlets (18 inches).
- Secure the wires with staples and tie the ground wires together using crimp sleeves.
- Mount the electrical boxes (switch boxes and saddle boxes) to the wooden studs.
- Drill holes through the centre of the studs to create a path for the wiring.
Activity 7: Spoken English Activity
Work with a partner and discuss the following points:
- Roleplay: Imagine one of you is a master builder and the other is a new apprentice. The builder must explain the 6/12 rule to the apprentice. Use the diagram from Activity 2 to help your explanation.
- Discussion: In your opinion, was the video easy to follow? Would you feel confident helping someone with a project like this? Why or why not?
- Problem Solving: What would happen if you forgot to label the wires in the switch box before the drywall was installed? How would you find out which wire goes to the fan and which goes to the power panel?